Temperatures are dropping and fall has arrived! Now is the time to start thinking about winterizing your above ground swimming pool.
Temperatures are dropping and fall has arrived! Now is the time to start thinking about winterizing your above ground swimming pool. If you live in a freezing climate or don’t plan to use your pool for a few months, it’s a good idea to close your swimming pool for the winter. It will save you money on chemicals and power bills, and if you do live in a freezing climate, winterizing your pool protects it from damage that can be done when things freezes.
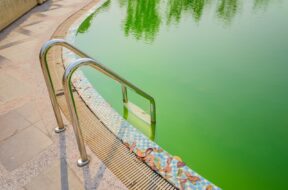
Winterizing your pool makes it easier for you to re-open the pool in the spring. If you properly close your above ground pool, it should be clear and free of algae when you open it back up. The last thing you want is to spend time dealing with a murky green pool when it’s time to swim!
What you should know
Many of the steps of winterizing a pool are the same for an inground pool as they are for above ground pools. Before you begin, there are some important differences you should know. The walls of an above-ground pool are exposed, which increases the risk of freezing that damages your pool. However, above ground pools are usually easier to winterize because they are in general simpler and smaller.
NOTE – The directions below are generalized to describe most above ground swimming pools. Your pool may have requirements that vary from those described here.
Step #1: Test and balance your swimming pool water
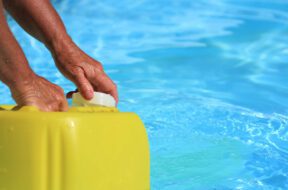
A few days before you plan to winterize your pool, test and balance the water. You want to make sure that your pool water is in good shape before you start the winterizing process. Make sure to reference the Winter Pool Closing Chemical Kit you are using to close your pool, but typical ranges are:
pH: 7.4-7.6
Total Alkalinity: 80-120 ppm
Calcium Hardness: 200-400 ppm
Chlorine: 2-3 ppm
You can test your pool water by using our online Pool Calculator, at app.poolcalculator.com.
Step #2: Clean your pool
(For those who seeking to winterize an above ground swimming pool, you get to skip ahead to Step #5below).
Two or three days before you winterize, brush and vacuum your pool. Make sure you remove all organic matter such as leaves and debris, and clean the sides of your pool and vacuum the surfaces. If you have tiles, be sure to clean those, as it is much harder to remove buildup in the spring after it has had all winter to set. Phosphorus limiting products can help prevent algae growth over the winter. You want to remove as much as you can now to make sure your chemicals make it through the winter.
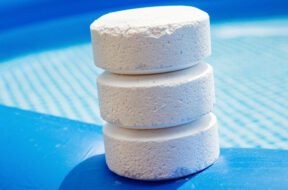
Step #3: Shock the Pool
After you have balanced your pool, you should shock it one last time. Typically, the Winterizing Closing Chemical kit will contain shock. If you are using a chlorine shock, wait for the chlorine level to drop back down before adding any algaecide. The effectiveness of the algaecide will be negatively impacted by Chlorine.
Step #4: Lower the Pool Water below the skimmer.
Drop the water level approx. 3 to 6 inches (7 to 15 cm) below the skimmer and all of the return lines. Use a skimmer plug to keep water out of the skimmer during the winter.
Since your pool water has chemicals, it’s best to drain the water into the sewage system for your home. Some localities allow you to drain onto your landscaping, but depending on the amount of chemicals in the water, there is potential risk of killing your plants.
It’s a good idea to run your filters for a day or two to remove as much particulate and organic matter as you can.
NOTE: Never completely drain your above ground pool. Emptying your pool increases the risk of damage significantly. If you live in a warm climate where there is no risk of freezing, you can skip this entire step.
Step #5: Remove the pump and filter system.
With an above ground pool, you should remove these systems completely. Make sure to wash them well before storing for the winter. Make sure to remove the winterizing plugs, especially if you are storing them outside where there is risk of freezing. Make sure to disconnect any filter hoses for winter storage.
NOTE: If you have a salt water system or a salt water generator, you should set the chlorine generator to the “Winter” setting if it applies to your model. Alternatively, you can remove the system and store inside for the winter. At this time you should also remove anything else that can be damaged if the water freezes. This includes strainer baskets, ladders, toys, pool floats, etc…
Step #6: Add Winterizing chemicals.
Add the algaecide and non-chlorine shock at this time. The best way to do this is to walk around your pool and add the liquid chemicals. This assures more even distribution.
Another interesting option to consider is the SeaKlear AquaPill Swimming Pool Winterizer Pill. This provides time-release chemicals all winter long. It safely floats below your winter pool cover and keeps the chemical level at a good level for up to six months.
Step #7: Install an air pillow and winter pool cover.
One of the key differences between winterizing an above ground pool and an in-ground pool is the use of an air pillow. An air pillow is a very important element of closing of an above ground pool. It protects the walls and skimmer of your pool from expanding ice, as the ice will compress the air pillow rather than the sides of your pool. It also helps reduce the amount of water that builds up on your pool cover.
Without an air pillow, water will build up and stay in the middle with no way to effectively drain. With an air pillow, the snow and water is pushed out towards the edges, and eventually up and over the edges of the pool. The winter pool cover protects your pool from debris which could cause an algae bloom in the spring, and keeps the chemicals you’ve added for winterizing protected from an excess load. Without it, the algae would eat the chemicals up before the winter is over. Make sure to secure the cover tightly to the sides of your pool.
A final useful piece of equipment is a pool cover pump. This can help keep water from building up on your pool cover.
Now that you’ve closed your pool, it’s time to go ski!
Not sure if it’s the right time to winterize your pool? Learn more by reading another helpful article on When to Close Your Swimming Pool.
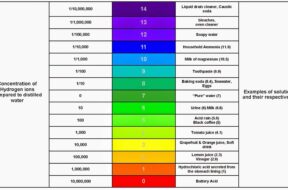
Maintaining both pH and total alkalinity in your swimming pool is important for keeping your pool properly sanitized and non-corrosive. Total alkalinity is to pH what cyanuric acid is to free chlorine. Total alkalinity stabilizes pH levels. The ideal pool pH level is 7.4 to 7.6. The ideal total alkalinity level is 80 to 120 ppm.
The Association of Pool and Spa Professionals recommends free chlorine levels for both swimming pools and hot tubs be kept between 2.0 and 4.0 ppm. However, the Center for Disease Control recommends free chlorine stay above 1 ppm in pools and 3 ppm in hot tubs.